This chapter contains the following topics:
Consolidating Activity from Multiple Companies
Printing a List of Member Companies
Linking Accounts Automatically or Manually
Generating a Consolidated Chart
Linking and Consolidating a Chart
The Company consolidation selection enables you to sum the business activity from several individual companies into a whole, so that you can produce an overall set of financial statements.
The ability to produce consolidated financial statements is very useful to any organization consisting of more than one company. Such consolidated statements are often necessary in managing the overall organization and in seeking capital.
Company consolidation is meaningful (and appears on the menu) only in a multi-company environment. Moreover, the selection is available only for a company described as a consolidation company in the Define multiple companies selection of the CTL menu.
It is not required that each company’s Chart of Accounts be identical, nor even that the account number format be identical. Before doing the consolidation, each member company’s account is associated with the corresponding consolidation company’s account.
| • | These linkages are maintained in what is called the Account Link file. |
| • | Depending on how similar the account structures actually are, generating these linkages can be nearly automatic. At the other extreme you may have to specify each link individually. |
| • | One or more member accounts, from the same or different members, can be linked to the same consolidation account. However, if you want to be able to break out each member’s contribution to the consolidated financial statements, you should ensure that no consolidation account is linked to accounts from more than one member. You can identify the member by reserving one segment of the consolidation account number structure for that purpose. |
Once account links have been established, you can create a consolidated Chart of Accounts, including budgets and comparatives.
The consolidation company, like any other company, requires its own financial statement layouts. You can create these from scratch, or you can copy layouts and texts from one or more member companies to the consolidation company.
At this point you can print consolidated financial statements.
You may have several consolidations existing at once. Each one requires its own consolidation company.
A consolidation company may itself be consolidated into a higher-level consolidation.
Company consolidation is used only in the General Ledger module. Although PBS applications (modules) other than G/L may be installed into a consolidation company, no purpose is served thereby.
Definitions
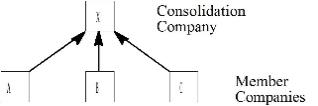
Consolidate means to summarize the business activity from several companies into a whole, as though they were one company. For example, the activity from companies A, B, and C could be summarized into company X. Company X would not be a real company, but just a dummy company to hold the consolidation.
This word is used in two senses:
| • | The action of summarizing the accounting activity of several companies into a whole. |
| • | The dummy company that you set up to hold the accounting activity of a group of other companies. |
A member is an individual company whose business activity is consolidated (along with other companies) into a consolidation company. For example, in the diagram, companies A, B, and C are members of consolidation company X (called the <consolidation company> or, simply, the consolidation).

To link means to tie a specific account in a member company to a specific account in the consolidation company.
The account in the consolidation company is also referred to as a consolidated account. For example, business activity from account 000-1000-000 in member B could be linked to consolidated account 200-1000-000 (or to any other, as you choose) in the consolidation company.
You must link each account in each member to one and only one account in the consolidation company before the actual consolidation and summarizing can be done. Multiple member accounts may be linked to the same consolidation account. The consolidation account and the member account can have the same or a different main account number.
A parent company is a legally recognized entity that has its own accounting records. It has subsidiaries, each of which has its own separate accounting records. Each company’s accounting records must not be altered, whether the company is a subsidiary or a parent.
|
Note |
A parent company is not the same as a consolidation company. Do not ever consolidate entries from a subsidiary into the accounting records of its parent company. Always set up and use a separate dummy company for the consolidation. In a consolidation, parent companies and subsidiaries are equally members. |
The Company consolidation selection provides the means of adding the entries of members together into the consolidated company.
This selection does not deal with inter-company accounting problems such as a sale of an asset between two companies. Your accountant is the expert on such matters.
This selection helps you to create a chart of accounts and a set of financial statements for the consolidation company, based on the charts and financial statement layouts of its members.
You may have several companies using General Ledger, some that you want to consolidate and some that you want to remain completely separate. Accordingly, you can specify which of your companies are to be members of a consolidation.
You can have more than one consolidation company, and you can designate each actual company as a member of one or more consolidation companies.
Restrictions
Some restrictions apply:
| • | If you are in a multi-user environment, only one user at a time can be using any Company consolidation selection. |
| • | Between the time that you define the account linkages and the time that you run the consolidation, you should avoid adding or deleting accounts in the consolidation company or its members. |
| • | The Account Links resides in the consolidation company, and is correctly updated when you run the Reformat account number selection for that company. It is not updated when you reformat a member company’s account structure. If you do this, re-create that member’s account links before attempting a consolidation. |
| • | The consolidation company and all its members must have the same number of accounting periods; however, members are not required to have the same dates for their accounting periods. |
| • | Each member company should have approximately the same fiscal year-end date. This rule is not being enforced. It would be possible to consolidate a member whose fiscal year ends in June with another member whose fiscal year ends in December; but the result would not be meaningful. |
| • | When the segments of a member company’s account number are larger than the corresponding segments of the consolidation company’s account number, you are warned of that fact but allowed to proceed anyway. Unintended account linkages may result if you link accounts automatically; these can be corrected manually as needed. |
| • | Data in the consolidation company transactions has no tie to the distribution history and the original document from the member company. |
| • | Because demo data as supplied is for a single company only, in this chapter no examples are given. |
To set up this function for use, follow Checklist A: Setting Up Company Consolidation. Use this checklist as a guide for the rest of this chapter. All of the steps on the checklist are needed to set up the structure to allow consolidation.
To do the company consolidation for each subsequent fiscal year, follow the steps in Checklist B: Consolidating Entries for Subsequent Years.
Before you produce financial statements for the consolidation company, you must consolidate (add to the consolidation company) entries from its members.
During the year, entries from member companies can be consolidated whenever you want.
Once they are consolidated, the entries are automatically restricted from being consolidated again, so that the same entry is not added twice to the same consolidation company.
|
Note |
You may override this restriction. For instance, if a company is a member of more than one consolidation company, the member’s entries can be consolidated more than once. Thus, member A’s entries (for example) can be consolidated into consolidation company X and again into consolidation company Y. Refer to the Consolidating Entries section later in this chapter for more information. |
At the end of the fiscal year, all member entries should be transferred into the consolidation company. Then the final consolidated financial statements can be printed.
Select
Company consolidation from the G/L menu.
All consolidation functions are available from this menu.
|
Note |
You must follow the steps in the Checklist A: Setting Up Company Consolidation, before this selection appears on the menu bar. If you haven’t completed this checklist, do it now and return to this section and continue. |
This selection lets you define what member companies constitute this consolidation company. A consolidation may have two or more members. There is no upper limit on the number of members.
In addition, the selection lets you describe how each member’s account structure is mapped to the consolidation’s.
| • | For each segment of the consolidation account except the main account, specify whether the contents of that segment are: |
To be derived from the corresponding segment of the member account, or
To be filled with a literal identifying the member.
| • | Your entries here are used to build a default consolidated account number for each member account number. You are not required to accept these defaults. |
When you run Link accounts manually, the defaults are available by pressing <F2>.
When you run Link accounts automatically, the defaults are applied automatically to all accounts in the range selected (but can still be overruled by running Link accounts manually for selected accounts).
The default always has the same main account number as the original, so if you have to change the main account number manual linking is required.
| • | Unless you intend to tailor each link manually, you should ensure that: |
Enough of the consolidated account is derived from the member account that you can identify the account in the consolidated financial statements.
Enough of the consolidated account is filled with a literal that you can identify the member in the consolidated financial statements.
Select
Enter member companies from the Company consolidation menu.
The following screen appears:
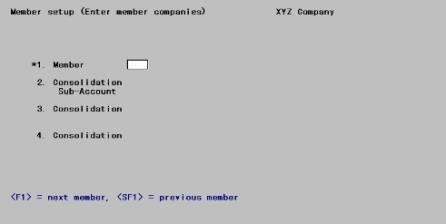
From this screen you can work with both new and existing members
Enter information as follows:
1. Member
Enter the company code of the desired member. For a new member, the company:
| • | Must already be defined in the Multi-Company file. Refer to the Define Multiple Companies chapter in the PBS Administration documentation. |
| • | Must be a different company from the consolidation company. |
| • | Must have the same number of accounting periods in the current year as the consolidation company does. |
You will be warned if any segment in the member company’s account number structure:
| • | Is absent from the account structure of the consolidation, |
| • | Is longer than the corresponding segment of the consolidation, or |
| • | Is alphanumeric in the member but numeric in the consolidation. |
It is legitimate but unusual for a member company to be itself a consolidation company. If you enter such a company, you will be asked to confirm that you really intend to do this.
Options
For an existing member you may use one of the options:
|
<F1> |
For the next member on file |
|
<SF1> |
For the previous member |
|
Format |
Two characters |
2. Consolidation sub-account
If the consolidation company does not use subaccounts, this field displays as Does not use sub-accounts and may not be entered.
Options
Otherwise, enter a literal to be included in this segment in all account links, or use the option:
|
<F5> |
Uses members. The field will be filled with the member company’s subaccount value |
|
Format |
One to eight characters, either numeric or alphanumeric, as defined for the subaccount in the consolidation company’s Control information |
If the consolidation company uses sub accounts, but not cost centers, the next two fields are not applicable.
[Description]
If you entered a literal, enter here the description of this segment to be included in the account link.
|
Format |
30 characters |
3. Consolidation xxxxx
xxxxx is the name of the first cost center segment, as defined in Company information for the consolidation company. This is usually division if there are two segments, or department if there is only one.
Options
Enter the department or division to be included in this segment in all account links. This must be a valid entry, previously defined in the CTL Cost centers selection for the consolidation company. You may instead use the option:
|
<F5> |
Uses members. The field will be filled with the member company’s value for the cost center. |
If you press <F5> and if both the member and the consolidation use two cost center segments, this segment of the default account number for this link will derive from one segment of the member’s account, but you have not yet determined from which segment. When you run Link accounts automatically you will have the opportunity of interchanging the two cost center segments.
|
Format |
One to eight characters, either numeric or alphanumeric, as defined for the first cost center segment in the consolidation company’s Control information |
[Description]
If you entered an actual division or department (as opposed to pressing <F5>), its name from Cost centers displays here. You may change it as desired. Any change applies only to the Account Links and is not preserved in Cost Centers.
|
Format |
30 characters |
4. Consolidation xxxxx
If the consolidation company has only one cost center segment defined in Company information, this field displays as Does not use cost center 2 and may not be entered.
Otherwise, xxxxx is the name (usually department) of the second cost center segment, as defined in Company information for the consolidation company.
Options
Enter the department to be included in this segment in all account links. This must be a valid entry, previously defined in the CTL Cost centers selection for the consolidation company. You may instead use the option:
|
<F5> |
Uses members. The field will be filled with the member company’s value for the cost center. |
If you press <F5> and if both the member and the consolidation use two cost center segments, this segment of the default account number for this link will derive from one segment of the member’s account, but you have not yet determined from which segment. When you run Link accounts automatically you will have the opportunity of interchanging the two cost center segments.
|
Format |
One to eight characters, either numeric or alphanumeric, as defined for the second cost center segment in the consolidation company’s Control information |
[Description]
If you entered an actual department (as opposed to pressing <F5>), its name from Cost centers displays here. You may change it as desired. Any change applies only to the Account Links and is not preserved in Cost Centers.
|
Format |
30 characters |
Field number to change ?
Options
Make any needed changes, or press <Enter> to complete this member and allow processing a different member. If this is an existing member, you may also use one of the options:
|
<F1> |
For the next member on file |
|
<SF1> |
For the previous member |
|
<F3> |
To delete this member. You may (but should not) delete a member even though links for that member are still present in the Link accounts manually selection. |
This selection prints a list of the member companies in this selection, and of the rules specified in Enter member companies for generating a default consolidated account number for each link.
See a Member List example in Sample reports.
Select
Print member companies from the Company consolidation menu.
No selection screen appears since all members are printed unconditionally.
To link accounts means to tie each member account to one and only one consolidation company account.
Producing a chart of accounts for the consolidation company requires two steps:
| • | Linking each member account to a consolidation company account. |
| • | Creating a consolidated chart of accounts from the links created in the first step. |
You can do this in several different ways, depending on how closely you want the consolidation company’s chart of accounts to resemble the members’ charts of accounts.
| • | If the consolidation company’s chart of accounts is to be exactly the same as the members, create the links and the consolidated chart of accounts all in one step. To do this, select Link and consolidate chart. |
| • | If the consolidation company’s chart of accounts is to be almost the same as the members, you can use a combination of automatic and manual linking. |
First, select Link accounts automatically and create the links.
Then select Link accounts manually, and tailor those links that you want different.
Then from the same menu, select Print link edit list to produce a list to check that the links are correct.
Finally, use Generate consolidated chart.
| • | If the consolidation company’s chart of accounts is considerably different from the members’, use Link accounts manually throughout. |
First, link each member account to a consolidation account.
Then use Print link edit list to produce a list to check that the links are correct.
Finally, use Generate consolidated chart.
This selection automatically creates account links for all or part of the consolidation company, using for each link the default account number built according to the rules specified in Enter member companies. Existing links if any are replaced.
| • | This selection only creates the links; it does not create a consolidated chart of accounts. To do that, you have to run Generate consolidated chart after running this selection. To do both in one pass, use Link and consolidate chart. |
| • | If your members’ charts of accounts are considerably different from one another, you may have to use Link accounts manually after (or even instead of) running this selection. To determine whether you need to do this, run Verify consolidation setup. |
This selection cannot be run until you have defined the account number structure of the consolidation company and have specified at least one member company.
Select
Link accounts automatically from the Company consolidation menu.
The following screen appears:
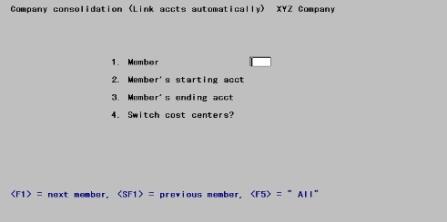
Enter information as follows:
1. Member
Options
Enter the ID of the member company from which you want to generate accounts in the consolidation company, or use one of the options:
|
<F1> |
For the next member |
|
<SF1> |
For the previous member |
|
<F5> |
For All members |
Upon entry or selection of a valid member, its name displays.
|
Format |
Two characters |
2. Member’s starting account and
3. Member’s ending account
If you selected All members for Field #1, these fields display as (Not applicable) and may not be entered.
Options
Otherwise, enter the range of account numbers to link. You may use the option:
|
<F2> |
For the First starting account number or Last ending account number |
|
Format |
The member’s standard account number format, as defined in the member company Company information |
4. Switch cost centers ?
In some consolidations, it is beneficial to place the member’s first cost center segment in the consolidation company’s second cost center segment. To do this two conditions must be met:
| • | The consolidation company must use two cost center segments. |
| • | The Enter member company selection for this member must specify uses member’s for at least one of these segments. |
If the conditions are not met, (Not applicable) displays. If the conditions are met, you must answer Y or N.
If you answer N, either or both segments for which uses member’s has been specified uses the value from the corresponding segment of the member.
If you answer Y, either or both segments for which uses member’s has been specified uses the value from the opposite segment of the member.
|
Format |
One letter, either Y or N |
Field number to change ?
Make any needed changes. Press <Enter> to create the links.
A running display informs you of which account is being processed:
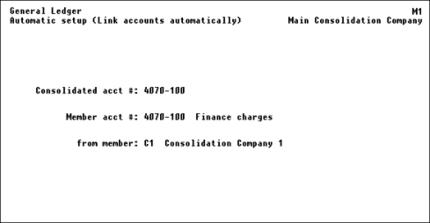
When processing is complete, press <Esc> to return to the menu.
This selection uses the account links to build either a consolidated Chart of Accounts file, a consolidated Budget file, or a consolidated Comparatives file.
Unless your situation is so straightforward that you have been able to use Link and consolidate chart, you need to run this selection after creating the account links (whether you have done so manually or automatically or by a combination of the two).
The Chart of Accounts contains the Actual amounts, but the Budget and Comparative amounts are on separate files. If you intend to use these in your consolidated financial statements, you must run this selection even though you have already run Link and consolidate chart.
The selection works by walking through the member file[s], and adding their amounts to the consolidation file. Only one consolidated file is processed at a time, either Chart of Accounts, Comparatives for one particular year, or Budgets for one particular budget type and year.
Records on the consolidated file/table are created if they do not already exist.
Previously existing consolidation accounts retain their account descriptions.
When consolidation occurs, the old information on file for the consolidation company’s selected budgets and comparatives is discarded before new information is created.
Newly created consolidation accounts are given the same description as found in the link from account in the first member company processed.
You can change any consolidated account description through Chart of accounts.
Creating a consolidated chart of accounts, either with Generate consolidated chart or Link and consolidate chart, does not automatically update the Cost Center file. You must do this manually if required, using the CTL Cost centers selection. Until you do so the newly-created account numbers will be rejected whenever you attempt to enter them in any selection. Similarly, the Group file/table is not updated, and any groups you wish to use must be entered manually using the Cost center groups selection.
Select
Generate consolidated chart from the Company consolidation menu.
The following screen appears:
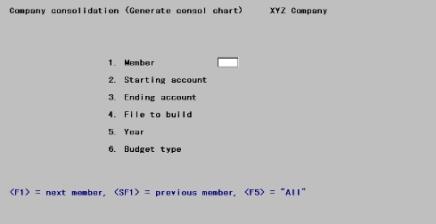
Enter the following information:
Options
Enter the ID of the member company from which you want to generate accounts in the consolidation company, or use the options:
|
<F1> |
For the next member |
|
<SF1> |
For the previous member |
|
<F5> |
For All members |
Upon entry or selection of a valid member, its name displays.
|
Format |
Two characters |
2. Starting account and
3. Ending account
You can specify a range of account numbers, whether 1. Member field specifies a single member or All members. The account numbers are those of the consolidation company, not of any member company.
Options
Enter the range of account numbers to process. You may use one of the options:
|
<F1> |
For the consolidation company’s next account |
|
<SF1> |
For the previous account |
|
<F2> |
For the First starting account number or Last ending account number |
|
Format |
The consolidation company’s standard account number format, as defined in Company information |
This field can be entered only if All members have been selected for the First through Last account. Otherwise, this field defaults to Actual.
Options
Enter a one character representation for the type of file to build:
|
A |
Actuals |
|
B |
Budgets |
|
C |
Comparatives |
Budgets and comparatives can be consolidated even when they are present in some member companies but not others.
|
Format |
One letter from the list above |
This field displays as (Not applicable) and may not be entered if 4. File to build field is Actuals.
Otherwise, enter the year of the Budgets or Comparatives to be generated.
|
Format |
9999 The full four digits are required. For comparatives, this must be a past year. |
6. Budget type
This field displays as (Not applicable) and may not be entered if 5. Year field is anything other than Budgets.
Options
For <Budgets>, enter the budget type. This must previously have been defined as a valid budget type in the consolidated company. You may also use one of the options:
|
<F1> |
For next budget type on file for the consolidated company. |
|
<SF1> |
For the previous budget type |
|
Format |
15 characters |
Field number to change ?
Make any needed changes. Press <Enter> and the consolidation accounts are created. A running screen display shows the record currently being processed. Press <Esc> when done.
This selection automatically creates account links and generates a chart of accounts for the consolidation. It is a rapid alternative to the process of linking accounts automatically and then generating the new Chart of Accounts (and a still more rapid alternative to the process of doing this manually).
However it is a technique that only applies when the same account structure is used for the consolidation company and all its members. Be warned that the program is not checking that the account number structures are identical, and will allow you to run the selection even if this is not the case.
This selection cannot be run until you have defined the account number structure of the consolidation company and have specified at least one member company.
Although actuals are created, budgets and comparatives are not.
Select
Link and consolidate chart from the Company consolidation menu.
The following screen appears.
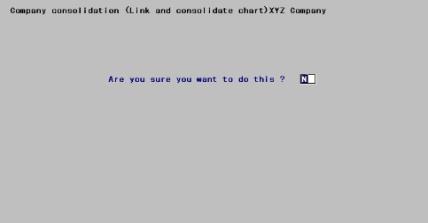
Are you sure you want to do this ?
Answer Y to continue or N to cancel.
If you respond Y, processing occurs automatically. The account number and member being processed are displayed.
You may press <Esc> to interrupt and resume processing. Upon termination, press <Esc> to return to the previous menu.
This selection lets you create account links individually, or modify links created by previous executions of this selection or of Link accounts automatically.
Select
Link accounts manually from the Company consolidation menu.
The following screen appears:
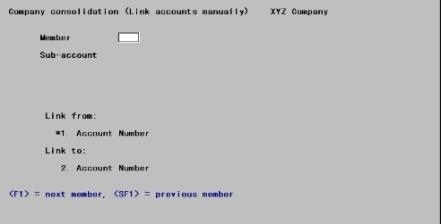
You can work with both new and existing links. If a link exists for the information you specify, that link appears and is available for changes or deletion.
Enter the following information:
Member
Options
Enter the ID of the member company whose links you want to process, or use the option:
|
<F1> |
For the next member on file |
|
<SF1> |
For the previous member |
Upon entry or selection of a valid company, the company’s name displays. Also displayed are the rules you have specified in Enter member companies for each segment of the company’s account number.
|
Format |
Two characters |
* 1. Account number (link-from)
Options
Enter a member account number, or use one of the options:
|
<F1> |
For next account link |
|
<SF1> |
For the previous account link |
|
<F2> |
For the next member account |
|
<SF2> |
For the previous member account |
|
<Esc> |
To allow selection of a different member company |
The account number be present on the member company’s Chart of Accounts.
|
Format |
The member company’s account number format, as defined in its Company information |
2. Account number (link-to)
Options
Enter a consolidation account number, or use one of the options:
|
<F1> |
For the next consolidation account number |
|
<SF1> |
For the previous consolidation account |
|
<F2> |
For the default account number, formed from the description of each segment appearing in the upper half of the screen. |
It is not required that the account number you enter conform to the rules shown in the upper half of the screen. Those are mere defaults which this selection lets you override.
The link-to account number does not have to be unique. More than one link-from account (from this and other members) may link to the same link-to account.
The account number entered does not have to be present on the consolidated company’s Chart of Accounts, since that Chart of Accounts will be created from your entries here.
It is not even required that the cost center segment[s] be defined in the consolidated company’s Cost centers selection. If it is not, you will have to define it before printing the financial statements.
|
Format |
The consolidation company’s account number format, as defined in its Company information |
Description
Options
For an existing entry, this field appears automatically. For a new entry, enter the description of this account to be used in the consolidated company’s Chart of Accounts, or use the option:
|
<F1> |
For the link-from description |
|
Format |
30 characters |
Field number to change ?
Options
Make any needed changes. Only Field #2 can be changed. Press <Enter> to process another link for this member.
For an existing entry you may use one of the options:
|
<F1> |
For next account link |
|
<SF1> |
For the previous account link |
|
<F3> |
To delete this account link |
This program prints a list of account links on file. You can use this to verify that all accounts are linked as intended before doing the consolidation.
See a Link Edit List By Member Company and a Link Edit List By Consolidation Accountexample in Sample Reports appendix.
Select
Print link edit list from the Company consolidation menu.
The following screen appears.
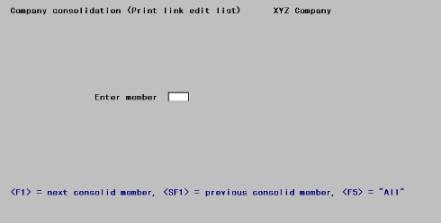
Enter the following information:
Enter member
Options
Enter the member company for which you want the report, or use one of the options:
|
<F1> |
For the next member on file |
|
<SF1> |
For the previous member |
|
<F5> |
For <All> members |
Upon entry or selection of a valid member ID, the member company name displays.
|
Format |
Two characters |
If a single member is entered or selected, the Link Edit List by Member report prints immediately upon selection of a printer.
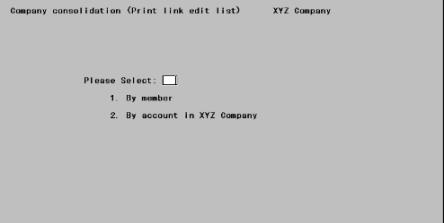
If All companies are selected, the following screen appears:
Enter the following information:
Please select
Enter 1 if you wish the report grouped by member company.
Enter 2 if you wish links to be listed by member company within consolidation account number. The report is sequenced by member company within consolidation account. No more than one account from each member can be linked to any one consolidation account.
Use this selection to copy a member company’s financial statement layout (and optionally his texts) into the consolidation company.
If a member layout is close to how you want a consolidation company layout to look, copy it and make changes to it as described in the Financial Statement Layouts chapter. If a layout is radically different, create an entirely new layout without using this selection.
Select
Copy layouts from the Company consolidation menu.
The following screen appears:
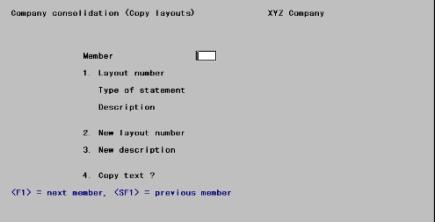
Enter the following information:
Member
Options
Enter the member company ID whose layout you want to copy, or use one of the options:
|
<F1> |
For the next member |
|
<SF1> |
For the previous member |
Upon entry or selection of a valid member ID, the member company name displays.
|
Format |
Two characters |
1. Layout number
Options
Enter the layout number of the existing layout you want to copy, or use one of the options:
|
<F1> |
For this member’s next layout |
|
<SF1> |
For the previous layout |
Upon entry or selection of a valid layout, its description displays.
After copying all the layouts from this member that you wish to, press <Esc> from this field to return to the Member field and to select a different member company to copy from.
|
Format |
999 |
2. New layout number
Options
Enter the number that you want to assign to this new layout in the consolidation company. This must not already exist in the consolidation company. You may use the option:
|
<F1> |
For the same number as the member company’s layout |
|
Format |
999 |
3. New description
Options
Enter the description for the new layout in the consolidation company, or use this option:
|
<F1> |
For the description in the member company |
|
Format |
Two lines of 25 characters each |
4. Copy text ?
This lets you copy texts that are already in the Text file of the member.
Texts from two or more member companies may be copied to the consolidation company. A text will not be copied if that text number is already on file.
Answer Y to copy the text from the layout you have selected, or N to not do so.
|
Format |
One letter, either Y or N |
Field number to change ?
Make any needed changes. Press <Enter> to copy.
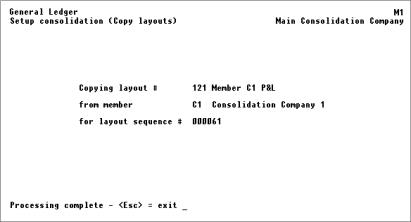
The following screen displays as processing occurs:
This selection verifies the account links and prints the Setup Verification Report. It should be run after the links have been created but before doing the consolidation, so as to detect errors.
This primarily ensures that all members have been properly linked. It also guards against accounts in either the member or the consolidation which have been added, deleted, or reformatted since beginning the linking process.
Inactive member accounts will be reported as well.
Select
Verify consolidation setup from the Company consolidation menu.
The following screen appears:
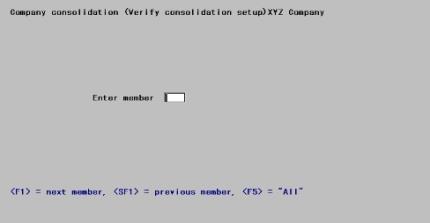
Enter the following information:
Enter member
Options
Enter the company code of the member company to be verified, or use the option:
|
<F5> |
For All members |
|
Format |
Two characters |
Any change ?
Answer Y to re-enter data, or N to continue.
The following screen appears:
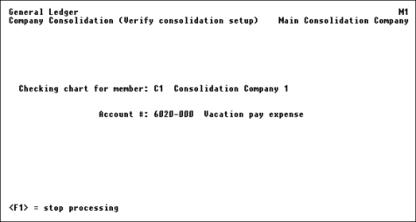
This displays the link currently being processed. You may press <F1> to interrupt processing. If you do so, press <F1> again to resume or <Esc> to cancel.
Upon completion, press <Esc> to return to the menu.This is considered a register and may not be directed to the screen
All of the preceding selections are used to prepare for Consolidate entries. This selection is where you actually perform the consolidation. It reads records from the member’s TRXFIL (G/L Transaction file) and adds them to the consolidation’s TRXFIL. The translation of account number from members to the consolidation company is controlled by the ACTLNK file. A report is printed as this happens. If a dry run is desired the report can be printed without doing the actual consolidation.
Use this function periodically to transfer entries from the members to the consolidation company. After transfer, you can make any necessary adjustments directly in the consolidation company.
As each member’s entries are added into the consolidation company, the entries are marked consolidated in the member’s file. These entries may be skipped in future runs, thus preventing the same entry from being added twice to the same consolidation company. You can override this safeguard if you wish.
Select
Consolidate entries from the Company consolidation menu.
The following screen appears:
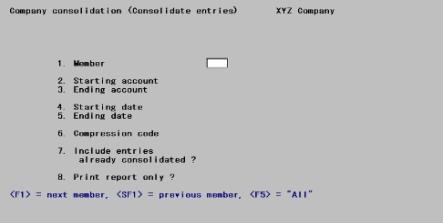
Enter the following information:
1. Member
Options
Enter the company ID of the member whose entries you want to consolidate, or use the option:
|
<F1> |
For the next member |
|
<SF1> |
For the previous member |
|
<F5> |
For All members |
|
Format |
Two characters |
2. Starting account and
3. Ending account
If All members were selected in Field #1, these fields display as First and Last respectively and may not be changed.
Options
Otherwise enter the range of accounts to consolidate. You may use the option:
|
<F2> |
For the <First> starting account or <Last> ending account |
|
Format |
Full account number format for the member company, as defined in that company’s Company information |
and
5. Ending date
Options
Enter the range of dates to consolidate.
You may use the option:
|
<F2> |
For the Earliest starting date or Latest ending date |
|
Format |
MMDDYY |
If the consolidation company transactions are empty (initialized) and you are entering a specific starting date, this message will display:
Since Member company selected is in 'Setup mode', "Earliest" needs to be selected to get Balance Brought Forward (BBFs) transactions. Enter Y to select "Earliest" Starting date.
Select Y to use "Earliest" date and N to use the entered date.
Multiple years of a member company's data are allowed in the consolidation company, but you may only consolidate to within the current and next fiscal year dates in the consolidation company accounting periods.
If the accounting period fiscal year for the member company does not match the consolidation company, you may still consolidate data. Here is an example of what will happen:
Member company has data dated 01/31/10 for the 2009 fiscal year
Consolidation company first period is 1/1/10 – 1/31/10, but for fiscal year 2010
So, the member company's transactions dated in January 2010, but in 2009 fiscal year, will be added to consolidation company's 2010 fiscal year
6. Compression code
During consolidation, entries from the member are compressed according to the code entered here.
Options
Your choices are:
|
N |
No compression |
|
D |
Compress by date |
|
P |
Compress by period |
|
Format |
One letter from the list above |
7. Include entries already consolidated ?
Entries in each member company are flagged as soon as they have been consolidated so that they will not accidentally be consolidated twice. This question is provided so you can override this safeguard. You would normally answered N here. Two cases where you might answer Y are:
| • | You have initialized all the files in the consolidation company and are starting over from scratch. |
| • | The same member company is being consolidated into more than one consolidation company. |
|
Format |
One letter, either Y or N. The default is N. |
8. Print report only ?
Answer Y to only print the Consolidation Edit List, without actually consolidating entries. This list shows what is in the consolidation company’s file after an actual consolidation. It is useful in locating errors in the consolidation.
|
Format |
One letter, either Y or N |
Field number to change ?
Change any field as needed. Press <Enter> to print the Consolidation Edit List and, if so specified, to consolidate the entries.
If any account links are missing, you will not be able to print the report. Run Verify consolidation setup to identify the missing links.
Are you sure you want to proceed ?
If you responded Y to Include entries already consolidated ? and N to Print report only?, you are asked this question and are informed that In this consolidation you have chosen to include entries that have already been consolidated to this or another consolidation company. If you do this you may be adding these entries twice to the same consolidation company.
Answer Y to proceed or N to cancel.
|
Format |
One letter, either Y or N |
As the report prints, a screen displays the account link currently being processed — provided that compression is not in effect. When compressing by either date or period, no display occurs.
When done, press <Esc> to return to the previous menu.
The legends provide no indication of whether or not consolidation actually occurred (i.e., whether you answered N or Y to Print report only?.
See a Consolidation Entry Edit List example in the Sample Reports appendix.
Some of the information provided on the Consolidation Edit List is:
| • | Source: The first two characters are the member company ID from which the entries are consolidated. The other digits are the subaccount of the member company from which the entries are being consolidated. |
| • | Reference: This is set to: Consolidation from Co. XX, where XX is the member company ID from which the entries are being consolidated. |
| • | Doc-#: The first two characters are the member company ID from which the entry came. The last six numbers are the consolidation date. |
Follow this checklist to set up for company consolidation.
References you need:
| • | Define Multiple Companies chapter in the PBS Administration documentation |
| • | Company Information chapter in the PBS Administration documentation |
| • | Using General Ledger chapter in this documentation |
| • | Accounting Periods chapter in this documentation |
Step 1
Define your consolidation company. See the chapter titled Define Multiple Companies in the PBS Administration documentation. Remember to initialize the files for consolidation in this company if you choose to initialize manually.
Step 2
Run your General Ledger module. Enter the consolidation company as the company to process (when asked for company ID). Refer to the chapter titled Using General Ledger.
Step 3
Run Company information to enter information for the consolidation company. Refer to that chapter.
|
Note |
For a consolidation company, you must select to use at least one cost center. |
Step 4
Run G/L Control information to enter information for G/L. Refer to the Control Information chapter.
Step 5
Enter the accounting periods for your consolidation company. (Refer to the Accounting Periods chapter.)
The consolidation company and each of its members do not require the same number of accounting periods. The dates of these periods may be different.
Now refer to this chapter, beginning with the section titled Entering Member Companies and use this chapter as a guide for the rest of this checklist.
Step 6
Select Company consolidation on the G/L menu and select Enter member companies. Specify which companies are to be members of the consolidation company. Refer to the Entering Member Companies section of this chapter.
Step 7
Read the section in this chapter titled Linking Accounts Automatically or Manually to determine the linking method that best fits your situation.
Step 8
Create the links between member accounts and the consolidation accounts according to the method you chose in the section titled Linking Accounts Automatically or Manually. Then set up the consolidation company’s chart of accounts, based on these links. You can do this automatically (as explained in Linking Accounts Automatically,) or on an account-by-account basis (as explained in Linking Accounts Manually.)
Step 9
Create the consolidated chart of accounts, using Generate consolidated chart. If you used Link and consolidate chart this has already been done.)
Step 10
Create the consolidation company’s financial statement layouts by copying selected layouts from member companies. Editing them if necessary or define new statements with proforma techniques.
The Extract financial data layouts are not included in this step.
Step 11
If you used Link accounts manually, run Verify consolidation setup and handle any errors reported as needed. You may have some accounts in your consolidation Chart of Accounts that show as errors, but in fact are not (as explained in the section titled Verifying Consolidation Setup).
Step 12
You are now in setup mode and are ready to begin normal operation, which includes consolidating entries from member companies into the consolidation company.
If you would like to consolidate entries now, run Consolidate entries as described in the Consolidating Entries of this chapter.
Step 13
Review the text under Normal Operation in the beginning of this chapter.
|
Note |
After completing this checklist, you are ready to run financial statements for the consolidation company. |
Consolidation starts over for the next fiscal year. You do not have to re-do the set-up, since the Chart of Accounts and layouts already exist for the consolidation company.
It is not necessary to initialize your data files because the consolidation company will store multiple years of data. If you only want one years worth of data then you can initialize G/L transactions before you consolidate entries.
|
Note |
If you upgraded your data from RealWorld, or Versions 10 through 11.6, it is recommended that you initialize the G/L Transaction file/table first as in step 1 below. |
References you need:
| • | This chapter |
| • | General Journal chapter |
| • | Initializing Data chapter found in the PBS Administration documentation |
Step 1
Use Initialize data to create an empty G/L Transaction file/table for your consolidation company.
This step is only necessary if you do not want to keep multiple years of data for the member companies.
Step 2
Change your accounting period dates in the consolidation company to reflect year for which you want data.
Even if you select Earliest and Latest dates when consolidating, you may only consolidate data for the consolidation company current or next fiscal year. For more information see the 4. Starting date field in the Consolidating Entries section.
You must consolidate the data for all member companies for the year you are about to close, because on a normal system you cannot go backwards to a closed year.
|
Note |
If it becomes necessary to consolidate entries for previous years, initialize the consolidation company G/L transaction, G/L Control information and accounting period files. Enter the Consolidation Control information for the earliest year you want to consolidate. Enter accounting periods. Then you may consolidate entries again for all member companies selecting Y to Include entries already consolidated ?. Close the year and consolidate entries for the next year. Repeat the close and consolidate process until you are at the current fiscal year. |
Step 3
If you have made any change to the chart of accounts of any of your member companies, use Link accounts manually to update the links to the consolidation company.
Step 4
Use the Print link edit list selection to verify that your links are correct. If any errors are noted, restart this checklist at step 3 above.
Step 5
Run Generate consolidated chart, and answer Y to Clear budgets and comparatives?. This procedure creates the budgets and comparatives in your consolidation company’s Chart of Accounts file.
Step 6
Run Verify consolidation setup and handle any errors reported as needed by restarting this checklist at step 3.
Step 7
Run Consolidate entries to add the member entries into your consolidation company’s General Ledger Entry file.